Category Archives: tactics

Vital tips for playing light tanks in lower tiers – UPDATED

Too often, I see new players playing light tanks complaining about being bottom tier. Light tanks are meant to be bottom tier, due to the characteristics of their tanks: Being sneaky/having good camo rating, being fast, and having a long view range. Light tanks now got normal matchmaking, and they see tanks of the same tier as themselves and as all other types of tanks (+/- 2 tiers).

Light tanks keep their camo rating while on the move, unlike any other type of vehicle in the game. And if you compare view range, it is very obvious: M24 Chaffee has 390 meters view range, while the Pz.Kpfw. IV Ausf. H has 350. 40 meters might not seem like a lot, but in the game, it is enough.

So, how should you play light tanks? Let’s first have a look at how you should NOT play them. Continue reading

Two different strategies for increasing the skill level on your crew

When you play low tier battles, from tier I to tier V, the other players tend to have low skilled crews. Some players you will meet are likely to have played only a few battles in their tanks, and they might use crews at 90% base skill, or they have just started grinding their first skill.

But when you enter higher tier battles, tier VIII and above, you will meet players who use crews with three or more skills on their crew. If you use a low skilled crew, you will struggle a lot. Therefore you should take crew training seriously.

To train crew faster, it is advisable to use premium tanks, since they train crews faster than ordinary tanks.

There are two different strategies to training crews and prepare them for higher tier battles.

Strategy A: Boosting single crew members
If you are training a new crew for a specific type of tanks, and you already have one good crew for the same type of tank, you may use a “single crew member boost strategy”.

For example: My Cromwell (British medium) crew are all on their fourth skill, about 35-40%. I am also playing the tier VIII  British medium Centurion I. My crew on that tank is not as good as the Cromwell crew, since they are at their third skill, about 25-30%. What I do, is to use the Cromwell Berlin for boosting the Centurion crew, one by one. The Cromwell Berlin has a crew of five. When playing it, I choose four crew members from the ordinary Cromwell, and one crew member from the Centurion I. Then playing the daily double will boost all the crew, but the crew member with the “lowest” skill will get a double boost. So when I play the Cromwell Berlin once a day (or whatever), the one crew member from the Centurion I will get xp very fast.

The reason for choosing strategy A is obvious: You can grind a single crew members xp and still have a great crew in the tank. The tank will perform very good.

There are some downsides, however:

  1. If – in my example – the Cromwell crew has Brothers in arms and the Centurion crew member hasn’t, I will not get a benefit from that perk, since all crew members must have it. Brothers in arms is only effective when all crew members has reached 100%.
  2. The skill profile might me suboptimal. Again I will use the Cromwell Berlin example: On a tier VI medium like the Cromwell, camouflage is a bit better than repairs, because of the low hit points on the Cromwell. On a tier VIII, repairs is a bit better. Grinding a tier VIII crew in a tier VI might not be ideal, then. (But I still believe it is a viable strategy.)

Strategy B: Boosting multiple crew members

This is the opposite to to strategy A. Let me use an example from my recent battles: I have both the Ferdinand and the Jagdpanther II. Since I have multiple premium German tank destroyers, I decided to boost both of the crews on the Ferdinand and the Jagdpanther II. Therefore I played a lot of battles, constantly choosing the worst crew members from each tank in one of the premium tanks. I took me quite a while, but now both of these tier VIII tanks have crews on their fourth skill. I chose this way of doing it, since there are a total of 11 crew members on these tanks, and since I didn’t have a better crew in any other German tank destroyer.

The downside is that this takes a lot of time. I do not know how many battles I have played only to boost the crews on these two tanks, but it must be more than 100.

But from now on, I will choose strategy A to boost my Rheinmetall Borsig crew, one by one. I will soon have unlocked the tier IX tank German tank destroyers, and I will be able to put very decent crews in them.

Two situations where capping is a good alternative

Rushing for the cap circle right from the beginning is a bad idea. Most cap circles are impossible to hide in, and the enemy only need to damage your tank once or to score a critical hide to reset your cap points. Kill your enemies instead of capping. You earn more xp and credits by doing so.

However: Here are two situations where going for the cap circle is a good alternative. Continue reading

Equipment for light tanks and artillery

One question you will come to ask yourself is “what kind of equipment should I use on my tanks?” I will try to answer this, based on recommendations I’ve seen and heard, and based on my own experiences.

The type of equipment you should use depends on what type of tank you are driving. Let’s run through them type by type. But first a few words about my “philosophy” when it comes to using a tank’s strengths and weaknesses. Very few tanks are good allround tanks, maybe except tier IX and X medium tanks. Most tanks and types have certain strengths and weaknesses, and you have to play them accordingly. When it comes to equipment you can either use it to compensate for weaknesses or to enhance it’s strengths.

My personal philosophy is to equip tanks to increase their strengths, and to use their relative advantages to the fullest. This also includes what kind of crew skills I choose.

Light tanks

I may be a bit controversial on this one. Really good light tank drivers will certainly recommend something different than I do, but my choice is what I think is the correct setup for newbies up to medium good players:

  1. A camouflage net increase your tank’s stealthiness by 10% when you have been standing still for 3 seconds or more. Even if there are fever and fever maps with bushes for passive scouting, there still are enough possibilities. (Only yesterday my passive scouting in a match resulted in 4.250 assistance damage, and I became the best player on my team.) If you move, the camouflage net loses it’s effect, but it is a great equipment on the right map. And you can move a net from tank to tank without any cost.
  2. Binoculars increase your view range by 25% when you have been stationary for more than 3 seconds. Therefore it is – like the camouflage net – for passive scouting only. Remember that even if your tank has a view range of more than for example 500 meters, the maximum view range in the game is actually 445 meters. What those extra meters of view range means, is that your view range will be used to reduce the effect of the enemy’s combined camouflage “effect”. (= camouflage value on a tank + camouflage net + camouflage skills on the crew)
  3. You can not win a game only by passive scouting. So the third equipment I use on light tanks is coated optics, which gives you an extra 10% view range when on the move. This might not sound like a lot, but remember that light tanks keep their camouflage values when they move. A good scouter moves a lot when passive scouting is not possible. So that extra 10% will be enough to spot a heavy tank with a low view range.

Better players than me will definitely choose equipment that increase the performance of the gun, for instance a vertical stabilizer. I have played the tier VI american light tank T37 a lot lately. At first I used binoculars, coated optics and vents, but then I swapped the vents for the camouflage net, and I think my performance in that tank increased after I change the equipment.

On tier VIII light tanks gun performance is more important, but for tier IV to VII I believe my setup is quite okay. On tier I to III you can use a toolbox instead of coated optics, since you can move it for free to other tanks. (Spending 500.000 in game credits for equipment on a tier I tank is a bit….. silly?)

Arty

It is in my opinion a lot easier to choose equipment on an arty than on and other type of tank. To maximize the strengths of an arty you have to focus on reload and aim time. Therefore the setup is:

  1. An enhanced gun laying drive increases the aim speed by 10%. Anyone who has played an arty knows how frustrating it is to wait for the gun to aim fully.
  2. An artillery shell rammer decreases the reload time by 10%. You just have to use one!
  3. The third equipment is a difficult one to choose. I have tried different ones, and on my artillery I now have three different equipment in the third slot: A spall liner (increases the protection from light vehicles which will find you), camouflage net (see above) and vents, which will decrease reload and increase aim speed. Choose any. When your crew has got reasonable camouflage skill, you might want to choose not to use the net. Vents might be the best all round equipment.

On a later post I will recommend equipment for medium tanks, tank destroyers and heavy tanks.

To cap or not to cap?

One mistake I see a lot of newcomers to World of tanks are doing, is to rush for the enemy cap zone. Let’s get one thing clear: The individual player earn more XP by doing damage to the enemy than by capping. And the xp is what you want, not cap points.

If you focus on defending your own cap circle, and damage enemy tanks that try to cap, you will get much more xp than by capping yourself. In fact, you can get the same amount of xp in a few seconds by damaging a tank inside your own cap circle as you can do by capping. Let’s say an enemy tank has stayed inside your cap circle and reached 85 to 90 cap points. If you damage that tank and reset the cap, with as little as one single damaging shot, you will earn more xp than if you cap to a 100% yourself.

And if the tank inside your cap circle is one or even two tiers higher than your own tank, you will earn even more xp. Continue reading

Pay attention to where you are going

This is a fairly short post about something very specific: Pushing or bumping into allies.

Recently I had a game where one of my allies obviously was a newbie, and did not pay enough attention to where he was going. I was playing with my T67 on El Halluf. When playing the T67 at this map, I prefer to go to one of the ridge lines and wait to see where my team mates are going, while I spot for scout tanks. (Later on on this map, I will move to support my team and/or flank enemies.

So I positioned myself, and waited for my binoculars to kick in. Just when they did, an ally started pushing me over the ridge line. I don’t think he did it on purpose, but nevertheless. I had to move. So I went to a different position, and started spotting and waiting again. Less than a minute later, the same ally came to where I was and did the same again! I guess he drove his tank in sniper mode, not paying attention to the mini map.

But he must have heard the sound from the collision, and he must have noticed that his progress halted, as he slowly pushed me over the ridge line again.

So, what is the lesson to be learned from  this? My ally probably didn’t learn anything, but the advice from me is: Do not push or bump into your allies. If they are aiming for an enemy and you bump into them, and your ally will either miss his target or will have to aim again. In any case: Any such behavior will reduce the efficiency of your team, and this will in the long run reduce the win rate of your team, and – of course – your win rate.

You might ask “Why should I  care about how well my team mates are doing?” Simply because you will benefit from it. A win will increase your XP and your in game credits, remember?

How to use bushes – video tutorial

A while ago – quite a long while ago, actually – I wrote about how to use bushes. Recently, I discovered a great video tutorial by Sir Havoc, where you can see what I described in action. Here, take a look:    

As a matter of fact, just the day before I found this, I used some of it’s “mechanics”, so to speak. I was playing on Prokhorovka. Our team spawned to the south, so I went on top of the hill to the east. I got there a while before my team, so I waited in a bush in case someone from a higher tier came up the opposite way.

Within seconds, an enemy Cromwell rushed towards me, but stopped halfway inside a bush, trying not to be detected from the west. He could not see me, just 60 – 70 metres away. I did NOT fire at him, because that would have meant that I would be detected. He got destroyed within a few seconds, due to my spotting. Just before he was killed, I took a shot and fell back. One important kill secured, and I got a lot of assistance damage.

How to use bushes?

A lot of newbies to World of tanks have understood one aspect of using bushes: If you stay inside a bush, you can be difficult to be spotted. Bushes are excellent for passive scouting. However, bushes are not entirely safe. Let’s see why.

Firstly: If you stay inside a bush, and only move your turret, your camo-rating isn’t affected. If you have mounted a camo-net on your tank, it stays active. However, if you move your tank, your camo-rating drops,and your camo-net disables. (The net will enable again after staying stationary for 3 seconds.) There is one exception from this “rule”, and that is with light tanks. They have the same camo-rating while they move as when they are stationary. For all other tanks, your camo-rating drops. Basically, your camo-rating on the move is about 1/3 of your rating when you are stationary. If you fire your gun, your camo-rating is about 1/4 of when you are stationary.

Therefore: If you stay inside a bush to scout, don’t do anything, except rotating your turret to look.

The reason why your camo-rating drops when you shoot, is because everything around you, within 15 meters turn transparent when you fire your gun. The bush turns “invisible”, so to speak.

There is one way to avoid this, that you have to learn: If you move behind the bush, and the bush is 15 meters in front of you, it will not turn invisible. Well, then, how do you know if you are 15 meters behind a bush? If you go into sniper view by zooming in with your mouse wheel, and view in the direction you want to fire, and you can see the scenery/landscape beyond  the bush, you are less than 15 meters from the bush. If you move backwards, until you only see the leaves on the bush, you are more than 15 meters away from the bush. You will still see the outline of any tanks that are lit up, though, but not other scenery, like houses or rocks.

So: If you stay 15 meters behind a bush, and shoot at an enemy, that enemy cannot spot you.

However, one also has to take into consideration proximity spotting. If an enemy is less than 50 meters away from you, you will still be spotted, also through houses and rocks, and, of course, if you stay inside a bush.

Staying less than 15 meters from a bush.

Staying less than 15 meters from a bush.

What is a platoon, and how do I do it?

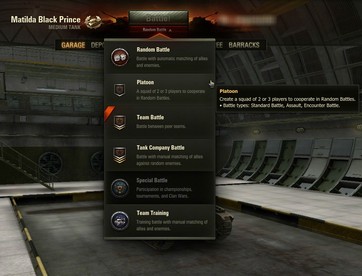
A platoon is a way of playing World of tanks with one or two friends. You form a platoon by inviting your friends into a platoon that you form, or by accepting their invitation. A platoon consistes of two or three players. Here’s how to:

How to form a platoon

How to form a platoon

If you want to get full advantage of playing in a platoon, you should be able to talk to each other, either using Skype or Teamspeak or any other voice communication you prefer. This post is going to concentrate on a few basic principles regarding what tanks you should use.

As a general rule, you should always use tanks from the same tier. You can choose to let one player use a tank one tier higher or lower, but it is not recommended. This is because a platoon doesn’t dictate the matchmaking, or what tanks the rest of the team and the enemy team are using. It is perfectly okay if one member of the team is playing a medium, and the other a heavy tank, or a tank destroyer.

But be aware if you want to play light tanks. Some tanks are designated the role of a scout tank, and scout tanks are usually the lowest tier tanks on a team. So if one of the platoon members choose a tier 5 light tank, and the other(s) choose a tier 5 heavy tank, it is possible that the other tanks are tier 8. (This matchmaking is subject to adjustment by Wargaming.) As a thumb rule, a scout tank on a specific tier will meet tanks that are from one to three tiers higher. A tier 6 scout can meet tier 7, 8, 9 or 10. A tier 4 will occasionally meet other tier 4s.

These are the current scout tanks from tier 4 to tier 8. Some of them get “normal” matchmaking from time to time.

Tier 4
Pz. Kpfw. 38nA
Pz. Kpfw. II Luchs
M5A1 Stuart
T-50

Tier 5
VK-16.02 Leopard
ELC AMX
M24 Chaffee

Tier 6
VK-28.01
AMX 12t
59-16
T21
MT-25

Tier 7
Aufklärungspanzer Panther
T71
AMX 13 75
WZ-131
M41 Walker Bulldog
LTTB

Tier 8
AMX 13 90
WZ-132
T49
RU 251
Light T-54 (or Light T-54)

If one of the platton members are playing any of these, it is recommended that the other members in the platoon choose a tank at least one tier higher, or maybe two tiers higher.

Just recently a played in a team where there obviously were some newbies in the same platoon. One platoon member played a T1 (tier 1), while the other played his KV-1 (tier 5). The rest of the teams played tanks from tier 5 and 6. A T1 has nothing to do in such a battle. (It cannot even play the role as a scout, because it is to slow and has a short view range.)

Therefore: You should use tanks from the same tier. I will write about some basic platoon tactics in a later post.